Graphing a custom Data Query
In the previous section we examined how to create a new Custom Data Query to enable us to query the LM-SENSORS-MIB::lmTempSensorsTable for temperature information. In this section we shall explore how to produce graphs of this information.
Creating a new Graph Template
Before Cacti can generate a graph for a Data Query it needs to know how that data should be presented. As we discussed in the Basic Cacti Concepts section of this document that description is referred to as a Graph Template. We can display a page containing a list of all the currently available Graph Templates by clicking the Graph Templates entry on the Cacti main menu.

As you can see in Figure 4.1 [The Graph Templates page], above, the Graph Templates page includes is a link labelled Add which will enable us to create a new Graph Template describing how we would like Cacti to graph the temperature data we obtained in the previous section. Clicking on the Add link will display the Graph Template [new] page, as shown in Figure 4.2 [Creating a new Graph Template] below.
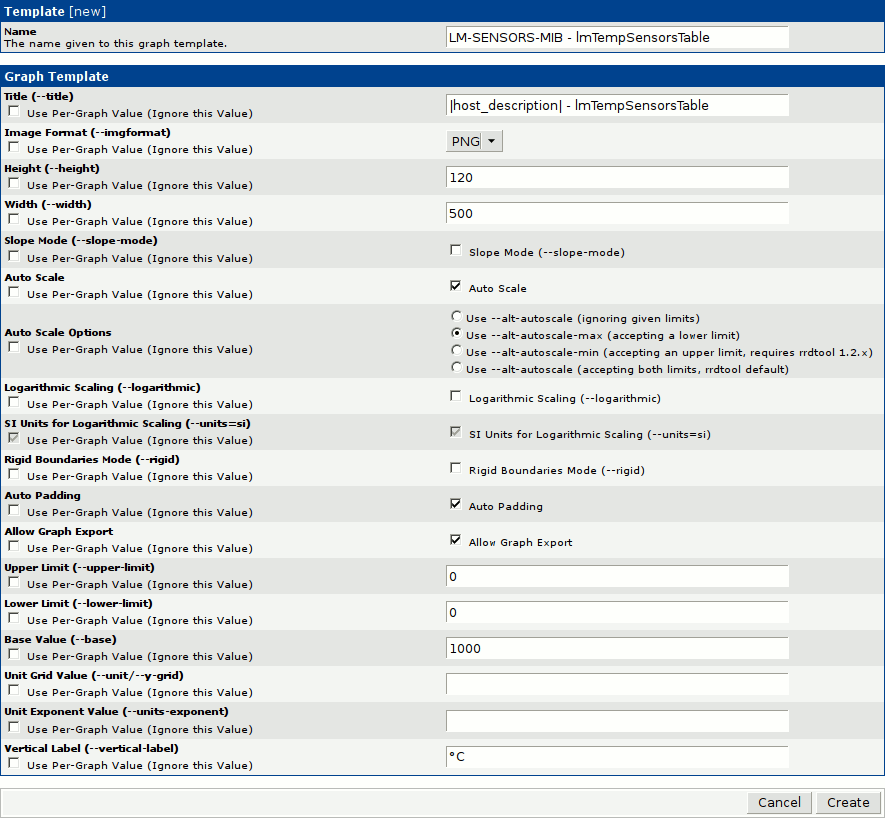
As the example above shows there a number of fields which must be completed to create a new Graph Template. The table below describes those fields where the default values have not been used as well as providing suggested values.
| Suggested values for the Graph Template form | |
|---|---|
| Name | The Name field should contain a recognisable name for this Graph Template. It will appear in the Cacti user interface whenever this Graph Template is referenced. |
| LM-SENSORS-MIB - lmTempSensorsTable | |
| Title (--title) | The Title field should contain a title to be used by the graph. The special keyword |host_description| will be expanded to the name of the target device when the graph is rendered. |
| |host_description| - lmTempSensorsTable | |
| Slope Mode (--slope-mode) | If Slope Mode is selected then the displayed graphs will use a slightly sloped line when plotting the data. When Slope Mode is not selected straight vertical lines will be used. |
| No | |
| Upper Limit (--upper-limit) Lower Limit (--lower-limit) | The Upper Limit and Lower Limit fields allow for a maximum and minimum value to be specified for this graph template. A value of zero specifies no minimum or maximum should be imposed. It should also be noted that the value of the Auto Scale Options selection determines which limits are actually imposed regardless of the values set here. |
| 0 | |
| Base Value (--base) | The Base Value field provides control over the spacing between graph lines and labels. A value of 1000 is typically used although when graphing numbers based on a power of two exponent a value of 1024 is more suitable. |
| 1000 | |
| Vertical Label (--vertical-label) | Not surprisingly the Vertical Label field provides a space to enter text to represent the vertical label on the graph. As we are graphing temperatures it makes sense to specify °C here. |
| °C | |
Once you are satisfied with the values entered into the New Graph Template Form click on the Create button to create the new Graph Template.
Adding Graph Template Items
Now that we have created a new Graph Template we can add Graph Template Items which will be displayed when the graph is rendered. As you can see in Figure 4.3 [List of Graph Template Items] at the top of the Graph Template page for our new template there is an empty list of the Graph Template Items.
As we clearly wish to display a graph of our data let us begin by creating a new Graph Item. To add a new Graph Template Item click the Add link at the top right corner.

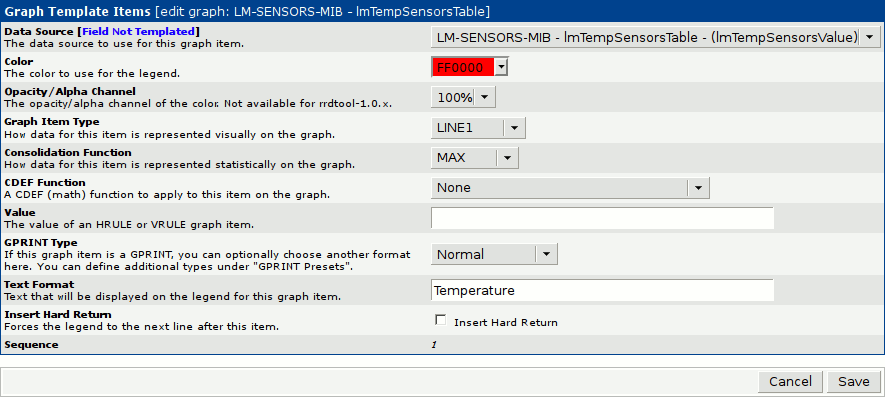
Once the Graph Template Items page has loaded we can begin by creating our first Graph Item. As you can see in Figure 4.4 [Creating a new Graph Template Item] there are a number of fields which must be completed for each Graph Item we wish to add.
| Suggested values for the first new Graph Item | |
|---|---|
| Data Source | The Data Source field allows the Data Template which will be used to provide data to populate this graph item to be specified. As we wish to use the Data Template we created in the previous section we have selected it. |
| LM-SENSORS-MIB - lmTempSensorsTable - (lmTempSensorsValue) | |
| Color | The Color field allows the colour of the Graph Item to be specified. In our example we have chosen a bright red although any other easily visible colour would have sufficed. |
| FF0000 | |
| Opacity / Alpha Channel | When plotting Graph Items it is sometimes desirable to be able to see what is behind the current graph layer, especially when AREA has been selected for Graph Item Type. By selecting a value of less than 100% this field allows the Graph Item to be made semi-transparent. |
| 100% | |
| Graph Item Type | There are a number of available Graph Item Type settings available. In our example we are using LINE1, which displays a one pixel wide line. Other values which produce a visible result are LINE2 (which displays a two pixel wide line), LINE3 (which displays a three pixel wide line), AREA (which displays a solid area), STACK (which produces a filled area stacked on top of the previous graph items) and GPRINT (which produces a printed text label). |
| LINE1 | |
| Consolidation Function | When displaying a graph at a resolution where several data points are combined into a single visible graph point the data must be consolidated. There are a number of available consolidation functions to choose from including AVERAGE (which takes an average), MAX (which takes the maximum), MIN (which takes the minimum) and LAST (which takes the last available value). As this is a graph of temperatures it makes sense to use MAX here to ensure that we see the highest temperature which has been reached. |
| AVERAGE | |
| CDEF Function | It is not uncommon for the data retrieved from the target host to be in an incorrect format for use directly on a graph. In fact the temperature data we receive is in thousandths of a degree so this is a perfect candidate for the use of a CDEF Function however, as we have not explored how to define such a function, we shall use None in this example. |
| None | |
| Text Format | When a visible Graph Item is displayed on the graph a legend is automatically created and displayed. The text for this legend may be entered here. |
| Temperature | |
| Insert Hard Return | If this will be the last Graph Item in this logical group then a new line will need to be forced to ensure that the graph legends appear correctly. When this item is selected a hard return will be inserted after this graph item. As we shall be creating more Graph Items we shall leave this un-selected. |
| False | |
Once you are satisfied that the new Graph Item will be created using the correct values click the Create button at the bottom right corner.
To make the graph more useful we can also add some text items to display the current, minimum and maximum displayed values. Click the Add link as before and fill our the form as shown in the example below Figure 4.5 [Creating a new Graph Template text Item].
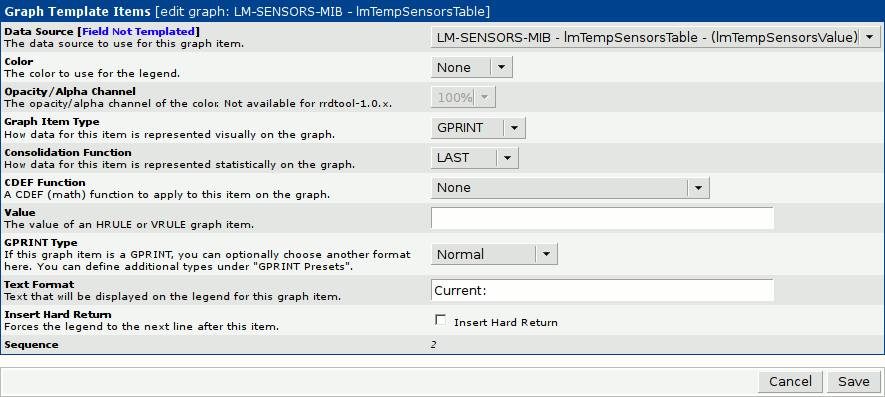
You should now be able to create additional Graph Items to display the minimum and maximum values. When all the relevant Graph Items have been created the Graph Template Items section should resemble that shown in Figure 4.6 [Completing the Graph Template Items] below.

Associating the Graph Template with the Data Query
Before we can instantiate a graph using our newly created Graph Template we still need to associate the Graph Template with the Data Query we created previously. To accomplish this we first need to access the Data Queries page by clicking on Data Queries on the Cacti main menu. Once the Data Queries page has loaded we then need to click on the SNMP - lmTempSensorsTable entry to display the Data Query detail page.
As you can see one of the sections of this page shows the currently Associated Graph Templates, as shown below in Figure 4.7 [Associating the Graph Template with the Data Query (Step 1)]. Presently there are no Graph Templates associated with this Data Query so the list is empty.

To create a new association between this Data Query and the Graph Template we created earlier we first need to click on the Add link at the top right corner of the Associated Graph Templates section to display the form shown in Figure 4.8 [Associating the Graph Template with the Data Query (Step 2)] below.

There are only two fields to complete, both of which are described in the table below.
| Suggested values for the Associated Graph/Data Templates form | |
|---|---|
| Name | The Name field allows a name to be specified for the associated graph. This name will appear in the Tree View and other locations in the Cacti user interface so should reflect the purpose of the graph. |
| LM-SENSORS-MIB - lmTempSensorsTable | |
| Graph Template | The Graph Template drop-down list allows the desired Graph Template to be selected. As we are interested in creating an association with the Graph Template we created in the previous section we have selected it. |
| LM-SENSORS-MIB - lmTempSensorsTable | |
Once you are satisfied that the new Graph / Data Template Association will be created using the correct values click the Create button at the bottom right corner.
Now that we have created a new Graph / Data Template Association we can provide some suggested values to be used by the templates when they are instantiated using this association. The first value we shall provide will be used in the Data Sources List to identify the corresponding Data Source.

As you can see in the above example Figure 4.9 [Associating the Graph Template with the Data Query (Step 3)] each entry consists of a string which will be used, after token expansion, as the value for the field and the name of the field for which this string will be used. A further description may be found in the table below.
| Suggested values for the Data Template "Suggested Values" form | |
|---|---|
| Data Template | The Data Template String we have specified will be used to label the corresponding Data Source in the Data Sources List. By utilising two special keywords we can ensure that the Data Source name includes both the host name (expanded from the |host_description| keyword) and the device name (expanded from the |query_lmTempSensorsDevice| keyword). |
| |host_description| - lmTempSensorsTable |query_lmTempSensorsDevice| | |
| Field Name | As the text string we created for the Data Template is destined to be used as the name of the Data Source we have specified name as the Field Name. |
| name | |
When you have completed the Data Template String and its corresponding Field Name click the Add button.
The final Suggested Value we need to provide will be used for the Graph Title when the graph is rendered. As you can see in Figure 4.10 [Associating the Graph Template with the Data Query (Step 4)] example below we have used the same string so that the host name and the device name are both included.

The main difference between the two entries is that we have used title for the Field Name so that the Graph Template knows that this value is to be used as the title.
| Suggested values for the Graph Template "Suggested Values" form | |
|---|---|
| Graph Template | The Graph Template String we have specified will be used as a title for the corresponding Graph. By utilising two special keywords we can ensure that the Graph Title includes both the host name (expanded from the |host_description| keyword) and the device name (expanded from the |query_lmTempSensorsDevice| keyword). |
| |host_description| - lmTempSensorsTable |query_lmTempSensorsDevice| | |
| Field Name | As the text string we created for the Graph Template is destined to be used as the title of the Graph we have specified title as the Field Name. |
| title | |
Lastly, we need to associate our new Data Query with one or more Data Sources for the new Graph Template. As you can see in Figure 4.11 [Associating the Data Query with the required Data Templates] the relevant Data Source has already been selected as has the only available output value. As this information is correct there is no need to change it however we do need to confirm the mapping by ticking the check-box on the right hand side.

Instantiating graphs
With the Data Query, the Data Template and the Graph Template defined and associated we are now finally in a position to actually display some graphs of temperature data. To accomplish this we need to navigate to the detail page for the Device to which we added our Data Query in the previous section and click the Create Graphs for this Host link (located at the top right hand corner).
Near the bottom of the page you should see a section titled Data Query [SNMP - lmTempSensorsTable], an example of which is shown in Figure 4.12 [Selecting the Data Queries to graph] below.

Select the temperature sensors you wish to graph from the list, or use the select-all box at the top right as shown in the example to select all available sensors, and click the Create button at the bottom right of the page. Assuming everything worked as expected you should see some text informing you that the graph was successfully created.
After some time has elapsed (so that some data can be collected) the Graph View for this host should contain a graph similar to that shown in Figure 4.13 [Example Temperature Graph] below.
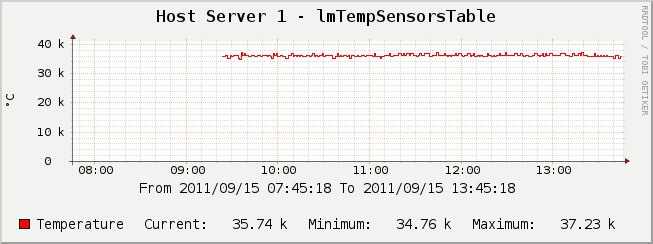
Astute readers will, at this point, have noticed two minor problems with our graphs. The first issue is that our graph seems to be indicating that our CPU is running at an average temperature of 35,750°C which, unless you are using an Itanium processor, is highly unlikely. This is caused by the sensor providing readings in thousandths of a degree. In the next chapter we shall examine how to create and use CDEF functions to rectify this shortcoming.
The second issue which is often cited at this stage is that the readings of multiple sensors could be better displayed on a single graph.