Creating a custom indexed SNMP Data Query
In this section we shall describe how to create a custom Data Query to retrieve indexed data from an SNMP enabled device. For the purposes of this example we shall use the Temperature Sensors table located under the LM-SENSORS-MIB::lmTempSensorsTable branch of the MIB tree.
More information on this topic can be found in the SNMP Data Query Walkthrough◳ section of the Official Cacti Documentation◳.
This example assumes you have a correctly configured lm_sensors installation. If you require more information on this subject then the Hardware monitoring guide, particularly the Monitoring temperature, fan-speed and voltage sensors section, may be of interest.
Locating the data in the SNMP tree
Before we can create a new Data Query we need to decide exactly what we shall be retrieving and where in the MIB tree that data is located. As mentioned above we shall be using the Temperature Sensors table located under the LM-SENSORS-MIB::lmTempSensorsTable OID. We can display this table using the snmptable utility to ensure that the data we desire is actually available from our selected device.
SNMP table: LM-SENSORS-MIB::lmTempSensorsTable
lmTempSensorsIndex lmTempSensorsDevice lmTempSensorsValue
12 Temp: CPU 1 37750
13 Temp: Memory 45000
14 Temp: Bridge 48000
Once we have verified that the lmTempSensorsTable is indeed available we can examine its structure in more detail using the snmpwalk utility, as shown in the example below. As Cacti only works with dotted-decimal addresses we have selected that output mode using the -On parameter.
.1.3.6.1.4.1.2021.13.16.2.1.1.12 = INTEGER: 12
.1.3.6.1.4.1.2021.13.16.2.1.1.13 = INTEGER: 13
.1.3.6.1.4.1.2021.13.16.2.1.1.14 = INTEGER: 14
.1.3.6.1.4.1.2021.13.16.2.1.2.12 = STRING: Temp: CPU 1
.1.3.6.1.4.1.2021.13.16.2.1.2.13 = STRING: Temp: Memory
.1.3.6.1.4.1.2021.13.16.2.1.2.14 = STRING: Temp: Bridge
.1.3.6.1.4.1.2021.13.16.2.1.3.12 = Gauge32: 37250
.1.3.6.1.4.1.2021.13.16.2.1.3.13 = Gauge32: 44000
.1.3.6.1.4.1.2021.13.16.2.1.3.14 = Gauge32: 48000
As you can see from the above output the lmTempSensorsTable is divided into three columns using sequential Object Identifiers with a base address of .1.3.6.1.4.1.2021.13.16.2.1. The next value is the column number which allows us to select a single column of data to retrieve.
In the following example we use the Object Identifiers we discovered above to query each of the columns in turn to ensure that we have actually selected the correct addresses.
.1.3.6.1.4.1.2021.13.16.2.1.1.12 = INTEGER: 12
.1.3.6.1.4.1.2021.13.16.2.1.1.13 = INTEGER: 13
.1.3.6.1.4.1.2021.13.16.2.1.1.14 = INTEGER: 14lisa ~ # snmpwalk -On -c hacking -v 2c host1 .1.3.6.1.4.1.2021.13.16.2.1.2
.1.3.6.1.4.1.2021.13.16.2.1.2.12 = STRING: Temp: CPU 1
.1.3.6.1.4.1.2021.13.16.2.1.2.13 = STRING: Temp: Memory
.1.3.6.1.4.1.2021.13.16.2.1.2.14 = STRING: Temp: Bridgelisa ~ # snmpwalk -On -c hacking -v 2c host1 .1.3.6.1.4.1.2021.13.16.2.1.3
.1.3.6.1.4.1.2021.13.16.2.1.3.12 = Gauge32: 37750
.1.3.6.1.4.1.2021.13.16.2.1.3.13 = Gauge32: 44000
.1.3.6.1.4.1.2021.13.16.2.1.3.14 = Gauge32: 48000
XML Data Query description
Now that we have the Object Identifiers we need to identify the table columns containing the data we wish to collect we can create the XML Data Query Binding which describes to the Cacti Poller how to query for the data we desire.
- <interface>
- <name>Get lmTempSensorsTable Information</name>
- <description>Get SNMP based Temperature Information from the LM-SENSORS-MIB::lmTempSensorsTable</description>
- <index_order_type>numeric</index_order_type>
- <oid_index>.1.3.6.1.4.1.2021.13.16.2.1.1</oid_index>
- <fields>
- <lmTempSensorsIndex>
- <name>Index</name>
- <method>walk</method>
- <source>value</source>
- <direction>input</direction>
- <oid>.1.3.6.1.4.1.2021.13.16.2.1.1</oid>
- </lmTempSensorsIndex>
- <lmTempSensorsDevice>
- <name>Device</name>
- <method>walk</method>
- <source>value</source>
- <direction>input</direction>
- <oid>.1.3.6.1.4.1.2021.13.16.2.1.2</oid>
- </lmTempSensorsDevice>
- <lmTempSensorsValue>
- <name>Value</name>
- <method>walk</method>
- <source>value</source>
- <direction>output</direction>
- <oid>.1.3.6.1.4.1.2021.13.16.2.1.3</oid>
- </lmTempSensorsValue>
- </fields>
- </interface>
You can see in the above example code that the schema is extremely simple. Lines 2 and 3 provide a name and a description respectively. Line 4 describes the index order, which in this case is numeric, and line 5 gives the dotted-decimal address of the index column of the SNMP table we are going to query.
Following this basic information (starting at line 7) is the description of the data fields which will be returned by this Data Query. As you can see each field is then described by a series of XML elements.
- <name>
- The <name> element allows a name to be specified for the field. The names specified for the fields here will be used in the Cacti application interface so should be descriptive.
- <method>
- The <method> element specifies the data acquisition method which is either get (indicating that snmpget should be used to retrieve the data) or walk (indicating that snmpwalk should be used to retrieve the data).
- <source>
- The <source> element specifies the source of the data (which in our example is value meaning the actual value returned by the SNMP daemon).
- <direction>
- The <direction> element specifies whether the data will be used to provide information when selecting the data to graph (input) or whether the data will actually be graphed (output). In our example above only a single value, the temperature as read from the sensor, is marked as output.
- <oid>
- Finally the <oid> element allows us to specify the dotted-decimal address of the column which we discovered earlier.
Create the new Data Query
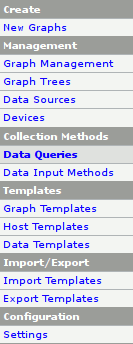
Now that we have created an XML Data Query Binding we can use the Cacti web interface to create a new Data Query. To accomplish this task we first need to select the Data Queries page from the Cacti main menu, as shown in Figure 3.1 [Cacti main menu].
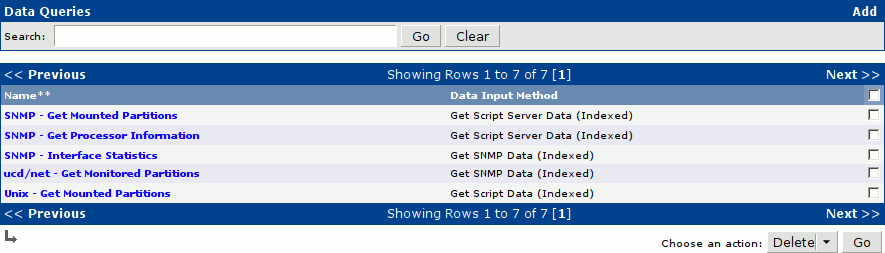
Once the Data Queries page has finished loading you should see a list of the existing Data Queries, similar to that shown below in Figure 3.2 [Data Query list]. As you can see Cacti is shipped with a number of Data Queries already defined. The list shows the template name, which Data Input Method is employed and provides a check-box which may be used to select one or more of the Data Queries and perform a variety of actions on them, including Delete which you can see in our example is the default option.
Additional Data Query Templates, including many contributed by end-users, are available from the Templates◳ section of the Official Cacti Documentation◳.
Besides deleting a Data Query the Data Queries page can also be used to create a new Data Query by clicking on the Add link located at the top right hand corner of the Data Queries box. As we are interested in doing just that click on the Add link now to display the Data Queries [new] page, as shown in Figure 3.3 [Data Queries [new]].
As you can see from the example below the Data Queries [new] page allows a new Data Query to be created by supplying some basic information relating to the Data Query.
![Figure depicting Data Queries [new]](/documentation/linux/management/cacti/diagrams/data-queries-new.gif)
For your convenience that information is replicated below in text form.
- Name
- SNMP - lmTempSensorsTable
- Description
- Get SNMP based Temperature Information from the LM-SENSORS-MIB::lmTempSensorsTable
- XML Path
- <path_cacti>/resource/snmp_queries/lm-sensors_temp.xml
- Data Input Method
- Get SNMP Data (Indexed)
Create the new Data Template
In the previous section we created a new Data Query which described how to retrieve data from the lmTempSensorsTable using SNMP. The next step is to describe to Cacti how to store this data by creating a new Data Template.
To begin creating a new Data Template we first need to navigate to the Data Templates List by clicking on Data Templates in the Cacti main menu.

At the top right corner of the Data Templates List there is a link labelled Add, as shown in Figure 3.4 [Data Templates list] above. Clicking on the Add link will load the Data Templates [new] form shown below in Figure 3.5 [Data Templates [new]].
![Figure depicting Data Templates [new]](/documentation/linux/management/cacti/diagrams/data-templates-new.gif)
As you can see in the example above there are several fields which need completing before we can submit the Data Templates [new] form and create a new Data Template. The table below describes the fields on the Data Templates [new] form and provides suggested values where appropriate.
| Suggested values for the Data Template [new] form | |
|---|---|
| [Data Template] Name | The [Data Template] Name field allows a name to be specified for this Data Template. As this value will be used in the Cacti user interface it should be descriptive. |
| LM-SENSORS-MIB - lmTempSensorsTable | |
| [Data Source] Name | When the corresponding Data Source is created the value of this field will be used as the Data Source Name. In this example we are using the special keyword |host_description| which expands to the name of the associated Device. |
| |host_description| - lmTempSensorsTable | |
| Data Input Method | As mentioned before there are a variety of Data Input Methods available. Here we are using the Get SNMP Data (Indexed) method to retrieve data from an SNMP enabled device. |
| Get SNMP Data (Indexed) | |
| Associated RRAs | Each Data Template may write data to one or more of the available Round Robin Archives. As we are using a Step time of 60 we will need to select all of the available RRAs. If we were using a Step time of 300 (five minutes) then it would make no sense to select the first RRA. |
| All | |
| Step | The Step time is the amount of time which passes between polling using the associated Data Query. A step time of 60 seconds (one minute), or 300 seconds (five minutes) is usually appropriate although occasionally a step time of 86400 seconds (one day) is useful. |
| 60 | |
| Data Source Active | This check-box must be checked for the associated Data Source to be active. |
| Yes | |
| Internal Data Source Name | When we created the XML Data Query Binding we named the fields using the XML element name. The value used here should correspond to that chosen earlier. |
| lmTempSensorsValue | |
| Minimum Value | Any value below the value specified here will be recorded by the RRD tool application as Not A Number (NaN). A value of 0 (zero) disables this function. |
| 0 | |
| Maximum Value | Any value above the value specified here will be recorded by the RRD tool application as Not A Number (NaN). A value of 0 (zero) disables this function. |
| 0 | |
| Data Source Type | There are a number of Data Source Types available. In this example we are using the GUAGE type as every reading from the Data Query will return an unrelated value describing the current temperature. Other values include COUNTER, which should be used whenever a constantly increasing value is returned by the query (for example the number of packets received on a network interface), and DERIVE, which allows for a value to be calculated based on other values. |
| GUAGE | |
| Heartbeat | The Heartbeat field allows for a heart-beat time to be specified. Usually a time of 600 seconds (10 minutes) is acceptable. |
| 600 | |
Once you are satisfied that the new Data Template will be created using the correct values click the Create button at the bottom right corner.
The page should refresh showing a new section labelled Custom Data, as shown in Figure 3.6 [Data Templates [new]] below.
![Figure depicting Data Templates [new]](/documentation/linux/management/cacti/diagrams/data-templates-new-custom-data.gif)
As we wish to use the Index Type, Index Value and Output Type ID we specified when we created the Data Source we need to tick those check-boxes as shown above and then click on the Save button.
Associate the new Data Query with a Device
Before we can test that our new Data Query is correctly receiving data we need to associate it with a Device so that the query has a target to run against. Select the Devices entry on the Cacti main menu, as shown in Figure 3.1 [Cacti main menu], to display the Device List. Once the Device List appears select the device for which you wish to generate temperature graphs. At the bottom of the Device page there is a box containing Associated Data Queries which shows a list of all the Data Queries associated with that device, as shown in Figure 3.7 [Associated Data Queries] below.

In our example there are already two Data Queries listed, one to measure Network Interface Statistics and another to measure the amount of free and used space on the monitored disk partitions. You can also see in our example that we have started the process of adding a new Data Query by selecting the SNMP - lmTempSensorsTable entry from the Add Data Query drop-down list. We have also chosen Index Count Changed as the Re-Index Method so that the RRA indexes will be automatically regenerated should the number of available sensors change. The Data Query can then be associated with our chosen Device by clicking the Add button.
Once the Data Query has been added the page will refresh and the new Data Query will be shown in the list. We can now verify that the query is operating correctly by selecting the Verbose Query entry for the Data Query we just created. Assuming that everything has worked as expected you should see output similar to that shown in the example below.
+ Running data query [11].
+ Found type = '3' [snmp query].
+ Found data query XML file at '/var/www/localhost/webapps/cacti/resource/snmp_queries/lm-sensors_temp.xml'
+ XML file parsed ok.
+ Executing SNMP walk for list of indexes @ '.1.3.6.1.4.1.2021.13.16.2.1.1'
+ Index found at OID: '1.3.6.1.4.1.2021.13.16.2.1.1.12' value: '12'
+ Index found at OID: '1.3.6.1.4.1.2021.13.16.2.1.1.13' value: '13'
+ Index found at OID: '1.3.6.1.4.1.2021.13.16.2.1.1.14' value: '14'
+ Located input field 'lmTempSensorsIndex' [walk]
+ Executing SNMP walk for data @ '.1.3.6.1.4.1.2021.13.16.2.1.1'
+ Found item [lmTempSensorsIndex='12'] index: 12 [from value]
+ Found item [lmTempSensorsIndex='13'] index: 13 [from value]
+ Found item [lmTempSensorsIndex='14'] index: 14 [from value]
+ Located input field 'lmTempSensorsDevice' [walk]
+ Executing SNMP walk for data @ '.1.3.6.1.4.1.2021.13.16.2.1.2'
+ Found item [lmTempSensorsDevice='Temp: CPU 1'] index: 12 [from value]
+ Found item [lmTempSensorsDevice='Temp: Memory'] index: 13 [from value]
+ Found item [lmTempSensorsDevice='Temp: Bridge'] index: 14 [from value]
+ Found data query XML file at '/var/www/localhost/webapps/cacti/resource/snmp_queries/lm-sensors_temp.xml'
+ Found data query XML file at '/var/www/localhost/webapps/cacti/resource/snmp_queries/lm-sensors_temp.xml'
+ Found data query XML file at '/var/www/localhost/webapps/cacti/resource/snmp_queries/lm-sensors_temp.xml'