Initial Cacti configuration
Once the Cacti web application has been installed it needs to be configured. This is accomplished using the web interface which can be accessed by visiting the web address where the application was deployed using a standard web browser. The default administrator login is admin for both the username and password. Assuming that you have deployed the Cacti web application to a server named logs in a subdirectory named cacti the administration address would be as follows.
Post installation configuration
The first time you access the Cacti web application you will be prompted to change the password for the admin account. Once you have done so you will be presented with the configuration screen shown below in Figure 1.1 [Cacti post-installation screen (1/3)].
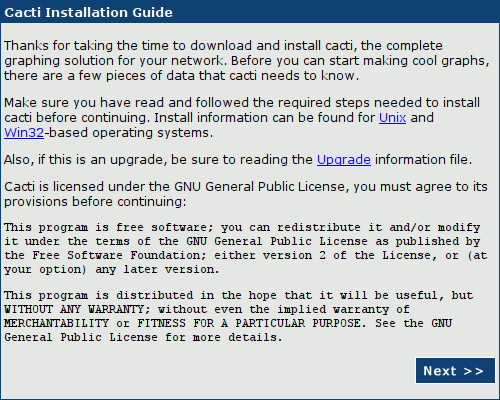
As you can see the first screen displays little more than the licence and a warranty disclaimer. Click on the Next button to proceed to the following page, shown in Figure 1.2 [Cacti post-installation screen (2/3)] below.
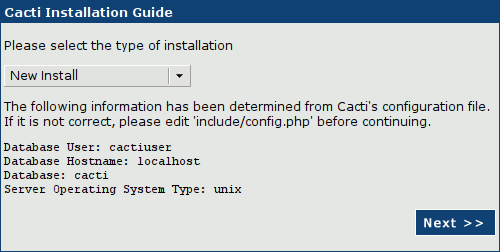
This is where the configuration actually starts to take place. As this is a new installation there should be no need to change the Installation Type as it should already have New Install selected. It is however a good idea to check that the database connection parameters are correct before clicking on the Next button.
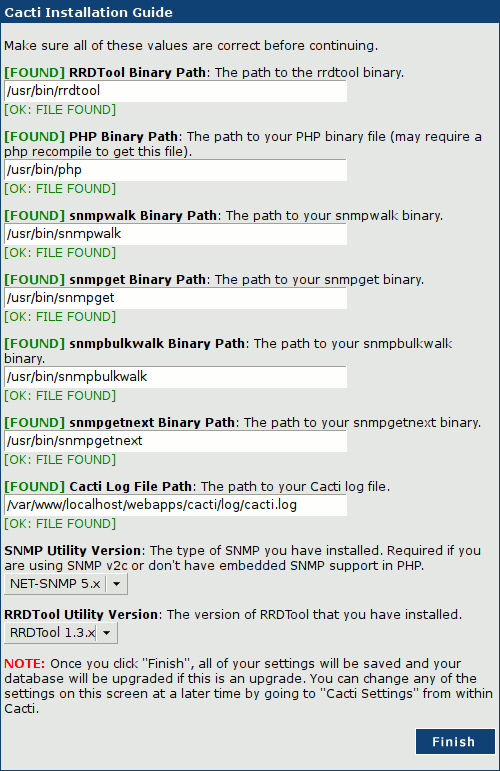
The third, and final, post-installation configuration screen is shown above, in Figure 1.3 [Cacti post-installation screen (3/3)]. As you can see this screen is mostly concerned with the paths where various utilities can be located. On a standard Gentoo Linux installation this should occur fully automatically and all paths should be displaying the green [FOUND] text above them and the green [OK: FILE FOUND] text below them. The versions of the SNMP utilities and the RRDTool utilities should also be auto-detected.
Initial Cacti configuration
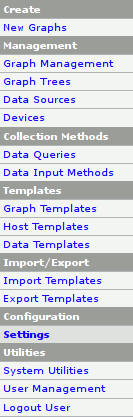
Once you click the Finish button on the final post-installation screen, see Figure 1.3 [Cacti post-installation screen (3/3)] above, you should be redirected to the Cacti home-page. Before you create devices and graphs however there are a few more configuration steps which must be completed.
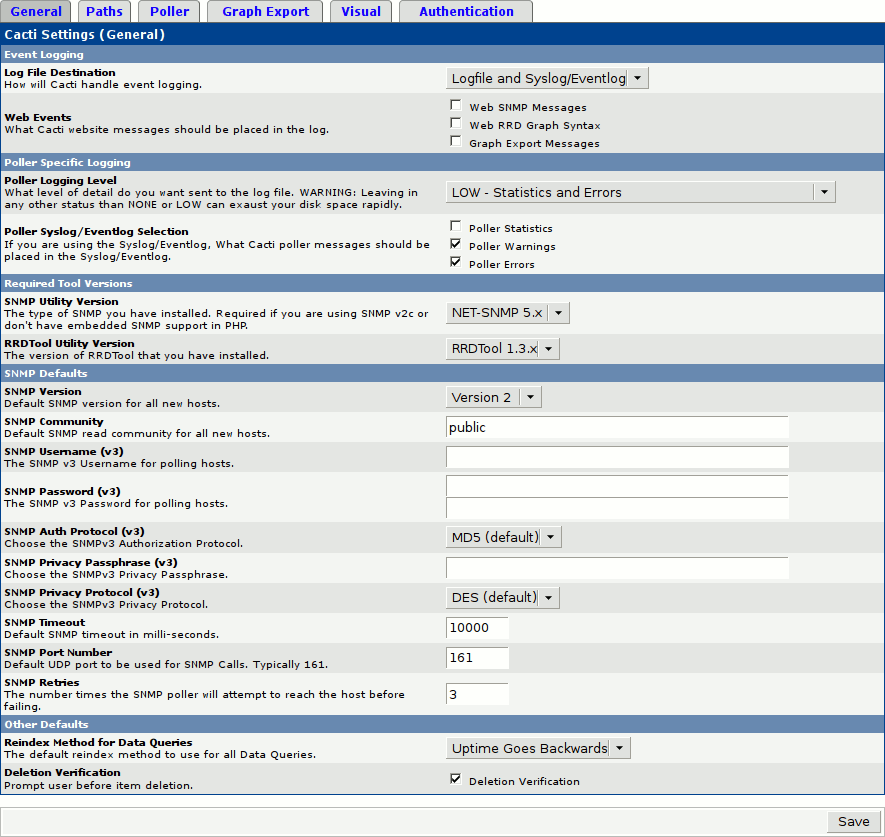
To begin this configuration process click on the Settings link on the Cacti main menu, as shown in Figure 1.4 [Cacti main menu]. The General Configuration screen should now be displayed, an example of which is provided in Figure 1.5 [Cacti Settings (General)] below.
As you can see there are a fair number of configuration options which can be modified on this page. Most however are related to Event Logging or the default SNMP configuration used by the poller. The table below provides a brief description of the most important Event Logging fields as well as example configuration values where appropriate.
| Logging configuration | |
|---|---|
| Log File Destination | The Cacti application can write information relating to significant events generated by the poller to either the System Log, a text file, or both. The Cacti application provides an integrated viewer for the file based version of the log however it is often desirable to have this information written to the System Log as well so that it can be more easily correlated with other system events. |
| Logfile and Syslog/Eventlog | |
| Web Events | Unless you are experiencing a problem with one of the items listed there is usually no reason to log information relating to any of these events. For that reason we have selected none of them. |
| None | |
| Poller Logging Level | This field controls the level of event logging sent to the log file by the poller. It is always a sensible idea to have Errors logged and, during initial configuration, Statistics can often provide valuable diagnostic information. If you are experiencing difficulties it may be necessary to temporarily increase this further to aid debugging. |
| LOW - Statistics and Errors | |
| Poller Syslog/Eventlog Selection | This field controls the level of event logging sent to the System Log by the poller. To save space in the System Log we have only selected Poller Warnings and Poller Errors. |
| Poller Warnings, Poller Errors | |
The table below provides a brief description of the most important SNMP Defaults fields as well as example configuration values where appropriate. As this guide is not intended to provide an introduction to the SNMP protocol we shall use the simplest form of security and authentication available, the Community Identifier. For more information relating to using the SNMP protocol see the Securing SNMPD with Access Control section of the Simple Network Management Protocol (SNMP) guide.
| SNMP defaults | |
|---|---|
| SNMP Version | This field allows the default SNMP version to be used when accessing devices to be specified. As we are using Community Identifier authentication we have selected version two. If you wish to make use of the advanced authentication and encryption services then you will need to select version three here and complete additional configuration. |
| Version 2 | |
| SNMP Community | When using SNMPv2 a Community Identifier must be supplied as a basic authentication mechanism. |
| public | |
| SNMP Timeout | This field allows the SNMP Timeout to be specified. Usually the default is half of a second, which is sometimes far too short, especially when querying slow to respond branches of the MIB tree such as the LM-SENSORS and SMART-CTL tables. We have therefore increased this timeout to ten seconds. |
| 10000 | |
| SNMP Retries | The SNMP Retries field allows you to specify the number of attempts that the poller will make when trying to query a device. Clearly, the SNMP Timeout multiplied by this value should not exceed the polling interval. |
| 3 | |
Once you are satisfied that the configuration is to your liking remember to click on the Save button at the bottom right corner to save your changes before navigating to another page.
In the next section we shall install and configure the Spine poller, as well as the remaining Paths.